Official Luthiers Forum!

Owned and operated by Lance Kragenbrink
It is currently Wed Aug 20, 2025 11:42 pm


All times are UTC - 5 hours


Forum rules


Be nice, no cussin and enjoy!


Post new topic Reply to topic  [ 68 posts ]  Go to page Previous  1, 2, 3  Next
Author Message
PostPosted: Fri Jan 10, 2014 3:18 pm 
Offline
Contributing Member
Contributing Member
User avatar

Joined: Fri Jul 05, 2013 12:57 pm
Posts: 903
Location: London, England
Focus: Build
Status: Amateur
It is a nice looking solution. How do you get the "undercut" to get "knife edges"?
And it doesn't seem as easy to floss as Motolla's solution?


Top
 Profile  
 
PostPosted: Fri Jan 10, 2014 3:20 pm 
Offline
Koa
Koa

Joined: Sun Jul 26, 2009 9:37 am
Posts: 697
First name: Murray
Last Name: MacLeod
City: Edinburgh
Country: UK
Nick Royle wrote:
John, Murray, are the conical washers unnecessary?
:)


Conical washers, Nick ...??? You've lost me ...where are the conical washers ?


Top
 Profile  
 
PostPosted: Fri Jan 10, 2014 3:25 pm 
Offline
Koa
Koa

Joined: Sun Jul 26, 2009 9:37 am
Posts: 697
First name: Murray
Last Name: MacLeod
City: Edinburgh
Country: UK
Nick Royle wrote:
It is a nice looking solution. How do you get the "undercut" to get "knife edges"?
And it doesn't seem as easy to floss as Motolla's solution?


Nick ...I am not sure as to what post you are referencing there ...always good to use the "quote" facility ...


Top
 Profile  
 
PostPosted: Fri Jan 10, 2014 3:35 pm 
Offline
Contributing Member
Contributing Member
User avatar

Joined: Fri Jul 05, 2013 12:57 pm
Posts: 903
Location: London, England
Focus: Build
Status: Amateur
Quote:
Nick ...I am not sure as to what post you are referencing there ...always good to use the "quote" facility ...

:) My mistake. I was referencing your post and John's. It just seems that one of the benefits of Mottola's solution is that one can floss the whole heel with sandpaper without hanger bolts or anything else getting in the way. With the hanger bolts you could only floss each side as if you were using a tenon and changing the neck angle seems harder to my inexperienced eyes. I may have to modify the neck angle as I drew the plan for this guitar! eek 
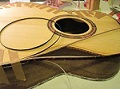
It's all non-standard so I'd like a little extra insurance. I like the idea of inlaying the inserts below the surface to leave enough wood for modification. Like so...

Attachment:
driving.JPG


Quote:
Conical washers, Nick ...??? You've lost me ...where are the conical washers ?

Mottola uses belleville washers, which I found advertised as conical washers, so I just assumed Americans and Brits called them different things. I believe the theory is that they introduce extra insurance against the bolts loosening.


You do not have the required permissions to view the files attached to this post.


Last edited by Nick Royle on Fri Jan 10, 2014 3:40 pm, edited 1 time in total.

Top
 Profile  
 
PostPosted: Fri Jan 10, 2014 3:39 pm 
Offline
Koa
Koa

Joined: Sun Jul 26, 2009 9:37 am
Posts: 697
First name: Murray
Last Name: MacLeod
City: Edinburgh
Country: UK
Nick Royle wrote:
It is a nice looking solution. How do you get the "undercut" to get "knife edges"?
And it doesn't seem as easy to floss as Motolla's solution?


Ahh ...I think I see what you are saying ..and yes...John Killin's pic is deficient in one respect .

Basically ...the end of the heel should have a routered channel in the center to facilitate fine tuning of the neck angle.


Top
 Profile  
 
PostPosted: Fri Jan 10, 2014 3:41 pm 
Offline
Koa
Koa

Joined: Sun Jul 26, 2009 9:37 am
Posts: 697
First name: Murray
Last Name: MacLeod
City: Edinburgh
Country: UK
sorry Nick ...cross posting ...


Top
 Profile  
 
PostPosted: Fri Jan 10, 2014 4:37 pm 
Offline
Koa
Koa
User avatar

Joined: Tue Mar 18, 2008 8:43 am
Posts: 776
Location: Florida
First name: John
Last Name: Killin
Focus: Build
Status: Amateur
The pic I posted of the hardware was my pre neck carve pic.

I didn't use any conical washers. The only hardware I used was what is shown in the original pic I posted. This is my personal guitar so I wasn't worried about it coming lose and me not being able to address it. So far I haven't had any issues and it has been a couple of years. If it had, I might have just added some locktite to the threads before tightening it down.

In the final version I had sort of created a pocket that was deeper than the mating surface of the outer edge of the neck. This isn't the greatest picture, but it shows what I was working with.
Attachment:
Neck Pocket.jpg


My initial sanding was done without the bolts in so it was similar to the Mottola method. After the bolts were in, cut a slot in the paper to clear them. Sort of a U shaped deal. For the final fine tuning of the center line alignment, I did some sanding on a single side with a 1" strip of paper. It took some fine tuning to get it right. Until you glue the neck on, you can remove the hanger bolts as needed.
Attachment:
Neck Floss.jpg


And while I'm digging through my pictures, here is one of the maple dowel I used under the heel cap.
Attachment:
Neck Dowel.jpg


I found this joint to be easy to use and I'd do it again.


You do not have the required permissions to view the files attached to this post.


Top
 Profile  
 
PostPosted: Fri Jan 10, 2014 4:52 pm 
Offline
Contributing Member
Contributing Member
User avatar

Joined: Wed Oct 08, 2008 11:36 am
Posts: 7475
Location: Southeast US
City: Lenoir City
State: TN
Zip/Postal Code: 37772
Country: US
Focus: Repair
Nick Royle wrote:
It is a nice looking solution. How do you get the "undercut" to get "knife edges"?
And it doesn't seem as easy to floss as Motolla's solution?


Nick, the neck is relieved with a laminate trimmer so only the two outside strips contact the body. In addition I use a chisel freehand to taper the strips towards the inside and leave about a 1/16" flat edge on the outside thus reducing the contact surface even more - this is where the "knife edge" comes from. This makes it much easier to floss the joint for a proper fit.

You can see I put in a maple strip but I just do it on the table saw and then clean up the slot with a chisel; that way I don't have to worry about keeping dowel stock around which usually isn't dimensioned all that well anyhow. The brass inserts are glued in with thick CA, if I recall. I used to use epoxy but don't waste the time to mix it anymore for that. Glad I saw this thread, in the future I will be going to the inserts Liutaio recommends. I've used enough of the brass furniture inserts that I can see that the metal inserts will work much better. Nothing wrong with hanger bolts, I just prefer using inserts. Using threaded inserts does make it a bit easier to floss.

Attachment:
IMG_1510.JPG


You do not have the required permissions to view the files attached to this post.

_________________
Steve Smith
"Music is what feelings sound like"


Top
 Profile  
 
PostPosted: Fri Jan 10, 2014 5:12 pm 
Offline
Contributing Member
Contributing Member
User avatar

Joined: Tue Jan 04, 2005 10:03 am
Posts: 6680
Location: Abbotsford, BC Canada
John Killin wrote:
I fussed with threaded inserts and then I decided to use hangar bolts. Grumpy uses them. They worked well.

Attachment:
Neck Bolts and Nuts.jpg


This is how I do it too. Very simple.

_________________
My Facebook Guitar Page

"There's really no wrong way, as long as the results are what's desired." Charles Fox

"We have to constantly remind ourselves what we're doing....No Luthier is putting a man on the moon!" Harry Fleishman

"Generosity is always different in the eye of the person who didn't receive anything, but who wanted some." Waddy Thomson


Top
 Profile  
 
PostPosted: Fri Jan 10, 2014 5:15 pm 
Offline
Koa
Koa

Joined: Sat Nov 07, 2009 9:34 pm
Posts: 552
City: winnipeg
State: manitoba
Country: canada
Focus: Build
Status: Amateur
On ukuleles, I use 1/4-20 tee nuts and a countersunk furniture bolt.
It has worked well for me.

Bob :ugeek:


Top
 Profile  
 
PostPosted: Fri Jan 10, 2014 5:18 pm 
Offline
Koa
Koa

Joined: Sun Jul 26, 2009 9:37 am
Posts: 697
First name: Murray
Last Name: MacLeod
City: Edinburgh
Country: UK
SteveSmith wrote:
Using threaded inserts does make it a bit easier to floss.


How does it make it easier to floss ...? I used hanger bolts on my (admittedly) one build to date, and I found it no problem whatsoever to floss to the correct neck angle.


Top
 Profile  
 
PostPosted: Fri Jan 10, 2014 5:21 pm 
Offline
Cocobolo
Cocobolo

Joined: Fri Mar 15, 2013 5:31 am
Posts: 222
First name: Bob
Last Name: Orr
Focus: Build
Status: Amateur
Screwfix in the UK do a range including steel inserts

http://www.screwfix.com/search.do?fh_se ... ew_size=20

Cheers, Bob


Top
 Profile  
 
PostPosted: Fri Jan 10, 2014 5:50 pm 
Offline
Koa
Koa

Joined: Sun Jul 26, 2009 9:37 am
Posts: 697
First name: Murray
Last Name: MacLeod
City: Edinburgh
Country: UK
Right ...cutting to the chase ..the fact is that threading into end grain is anathema to anybody who has an apprentice/journeyman experience of wood machining.

Sure, Bob Taylor uses threaded inserts in his guitars ...does that mean that everybody should follow suit ?

The reason Taylor use threaded inserts in the heel is exactly the same reason why Martin drill parallel holes for their bridgepins ...namely ...they are aware that only a very small percentage of their customers are savvy enough to query their methods ...and doing it the way they have always done it saves a stack of cash.

Think outside the box ...


Top
 Profile  
 
PostPosted: Fri Jan 10, 2014 5:51 pm 
Offline
Contributing Member
Contributing Member
User avatar

Joined: Fri Jul 05, 2013 12:57 pm
Posts: 903
Location: London, England
Focus: Build
Status: Amateur
Thanks, Bob, I saw them, they aren't what I'm looking for.

Really helpful information, John, thanks for that! Decent sized hole to drill in the heel, though, isn't it! I didn't think about the hanger bolts being easily removable, I just thought that once they were in they were in so couldn't see how you cut that step.

I may have sourced the ingredients for Metallo's, :lol: I mean Mottola's joint from a very kind OLF user, so I'm in two minds given the hanger bolt recommendations.

Mottola's way is easier for me. If the difference in crack susceptibility is academic, then the self tapping inserts appeal to me more. Surely, if he had any problems with guitars using that hardware, he'd put a note on the page or remove it altogether? He specifically recommends it for Maple end grain, which is exactly what I have.

Steve, Glad the thread was of some use to you! I was wondering how well dowels are dimensioned. I only have access to the locals school's pillar drill and apparently they aren't insured for me to use (or plain don't want me to use) the bandsaw or table saw, so Mottola's joint, straight into the Maple end grain is ideal for me in that I only need ten minutes there to setup and drill two holes.

Is it the risk of cracking during installation rather than in actual use that sways people toward hanger bolts? I'd love to see tests between them, maybe I'll have to do them myself.


Anyway, thanks to all! Everyone here is so helpful!

Quote:
How does it make it easier to floss
I thought it would be easier only before I realised the hanger bolts come in and out without any problems.


Top
 Profile  
 
PostPosted: Fri Jan 10, 2014 5:52 pm 
Offline
Contributing Member
Contributing Member
User avatar

Joined: Wed Oct 08, 2008 11:36 am
Posts: 7475
Location: Southeast US
City: Lenoir City
State: TN
Zip/Postal Code: 37772
Country: US
Focus: Repair
murrmac wrote:
SteveSmith wrote:
Using threaded inserts does make it a bit easier to floss.


How does it make it easier to floss ...? I used hanger bolts on my (admittedly) one build to date, and I found it no problem whatsoever to floss to the correct neck angle.


No bolts to hit - I did say a bit easier idunno

_________________
Steve Smith
"Music is what feelings sound like"


Top
 Profile  
 
PostPosted: Fri Jan 10, 2014 5:56 pm 
Offline
Contributing Member
Contributing Member
User avatar

Joined: Fri Mar 24, 2006 12:42 pm
Posts: 2360
Location: Windsor Ontario Canada
First name: Fred
Last Name: Tellier
City: Windsor
State: Ontario
Zip/Postal Code: N8T2C6
Country: Canada
Focus: Build
Status: Amateur
http://www.reidsupply.com/sku/STI-125/

These are great inserts and the shipping should be reasonable as the package will be quite small. I got turned on to these by Rick Micheletti and have not seen anything better.

Fred

_________________
Fred Tellier
http://www.fetellierguitars.com
Facebook page http://www.facebook.com/pages/FE-Tellier-Guitars/163451547003866


These users thanked the author Fred Tellier for the post: Nick Royle (Sat Jan 11, 2014 1:43 pm)
Top
 Profile  
 
PostPosted: Sat Jan 11, 2014 2:59 am 
Offline
Mahogany
Mahogany

Joined: Tue Jun 26, 2012 2:35 am
Posts: 90
First name: Lee
Last Name: Passmoor
City: Newport Pagnell
State: Bucks
Zip/Postal Code: MK16 8JG
Country: United Kingdom
Focus: Build
Status: Amateur
I used the type E inserts that Bob linked to from Screwfix in combination with a dowel in the heel, wicked in some CA, no hint of cracking and rock solid! Set it a little below the surface so can route out the recess without worrying about the router bit.


These users thanked the author flounder for the post: Nick Royle (Sat Jan 11, 2014 1:44 pm)
Top
 Profile  
 
PostPosted: Sat Jan 11, 2014 6:27 am 
Offline
Mahogany
Mahogany
User avatar

Joined: Tue Nov 11, 2008 5:36 pm
Posts: 68
First name: Edzard
Last Name: Kolks
City: Eindhoven
Country: The Netherlands
Focus: Build
https://shopen.rampa.com/

Germany, not UK.


Regards,


Edzard


These users thanked the author Edzard for the post: Nick Royle (Sat Jan 11, 2014 1:44 pm)
Top
 Profile  
 
PostPosted: Sat Jan 11, 2014 1:24 pm 
Offline
Mahogany
Mahogany

Joined: Fri Jun 03, 2011 7:12 am
Posts: 54
First name: Derek
Last Name: Gibson
City: Galloway
Country: Scotland
Focus: Build
Status: Amateur
I use these with a bit of ca
http://www.memfast.co.uk/shop/vprod4.asp?cat=2250005134


These users thanked the author Derek for the post: Nick Royle (Sat Jan 11, 2014 1:44 pm)
Top
 Profile  
 
PostPosted: Sat Jan 11, 2014 10:33 pm 
Offline
Contributing Member
Contributing Member
User avatar

Joined: Wed Jan 13, 2010 12:46 am
Posts: 1247
First name: Beth
Last Name: Mayer
City: Tucson
State: AZ
Country: United States
Focus: Build
Status: Amateur
John, what size hanger bolt do you use?


Top
 Profile  
 
PostPosted: Sat Jan 11, 2014 11:54 pm 
Offline
Koa
Koa
User avatar

Joined: Tue Mar 18, 2008 8:43 am
Posts: 776
Location: Florida
First name: John
Last Name: Killin
Focus: Build
Status: Amateur
Beth Mayer wrote:
John, what size hanger bolt do you use?


Beth,

I used 1/4" hangar bolts. The machine head part has a 1/4-20 thread. For length, I cut them down to size the fit what I needed.

John


These users thanked the author John Killin for the post: Beth Mayer (Sun Jan 12, 2014 12:48 pm)
Top
 Profile  
 
PostPosted: Mon Jan 13, 2014 10:10 am 
Offline
Walnut
Walnut

Joined: Fri Nov 22, 2013 10:30 am
Posts: 11
First name: neil
Last Name: mchardy
City: Carlisle
State: Cumbria
Zip/Postal Code: CA4 8QQ
Country: United Kingdom
Focus: Build
Status: Amateur
This is my take on this as I use the Mottolla method and find it brilliantly simple. I simply drill and tap some 1/2" whitworth brass bolts 6mm and cut them to about 18mm long. I drill the neck 13/32" and simply tap the neck 1/2" whit. using a sharp tap. Then with a greased 6mm screw inserted full depth in the insert with a nut to lock it. I butter the hole with epoxy then simply screw it in. When the poxy dries remove the screw and hunks yer bobble. I did a test piece trying to pull one out by tightening the screw with a packer, with a lot of force, and I mean a surprising amount, one tends to remove a huge chunk of wood. I believe virtually all the stress on the neck is from handling and the string tension thing is over played as the leverage the strings have is so little most of the load is straight back into the body. I put a 14mm beech dowel right through the heel to help tie it all together and so far "touch wood"


Top
 Profile  
 
PostPosted: Mon Jan 13, 2014 10:27 am 
Offline
Contributing Member
Contributing Member
User avatar

Joined: Wed Jan 13, 2010 12:46 am
Posts: 1247
First name: Beth
Last Name: Mayer
City: Tucson
State: AZ
Country: United States
Focus: Build
Status: Amateur
neil mchardy wrote:
This is my take on this as I use the Mottolla method and find it brilliantly simple. I simply drill and tap some 1/2" whitworth brass bolts 6mm and cut them to about 18mm long. I drill the neck 13/32" and simply tap the neck 1/2" whit. using a sharp tap. Then with a greased 6mm screw inserted full depth in the insert with a nut to lock it. I butter the hole with epoxy then simply screw it in. When the poxy dries remove the screw and hunks yer bobble. I did a test piece trying to pull one out by tightening the screw with a packer, with a lot of force, and I mean a surprising amount, one tends to remove a huge chunk of wood. I believe virtually all the stress on the neck is from handling and the string tension thing is over played as the leverage the strings have is so little most of the load is straight back into the body. I put a 14mm beech dowel right through the heel to help tie it all together and so far "touch wood"


Hi Neil,
My first question is….Is "Hunks your bobble" the same as "Bob's your uncle"? Loved that.
This is a great description, but I'm really visual…any chance you could post a picture of the neck with your bolts installed?
Thanks, Beth


Top
 Profile  
 
PostPosted: Mon Jan 13, 2014 10:42 am 
Offline
Walnut
Walnut

Joined: Fri Nov 22, 2013 10:30 am
Posts: 11
First name: neil
Last Name: mchardy
City: Carlisle
State: Cumbria
Zip/Postal Code: CA4 8QQ
Country: United Kingdom
Focus: Build
Status: Amateur
Yes Beth up here in Cumbria we say all sorts of rubbish, fanny's yer aunt, up to the makers nameplate, its all the same basically "there you have it" here's a piccy.
Image

Image


These users thanked the author neil mchardy for the post: Beth Mayer (Mon Jan 13, 2014 1:38 pm)
Top
 Profile  
 
PostPosted: Mon Jan 13, 2014 11:08 am 
Offline
Contributing Member
Contributing Member

Joined: Fri Oct 14, 2011 10:29 am
Posts: 502
First name: joseph
Last Name: sallis
City: newcastle-upon-tyne
State: tyne and wear
Zip/Postal Code: ne46xe
Country: UK
Focus: Build
Status: Amateur
I find it so hard to get over my hang-up that butt joints are as good as mortise and tenon but it must be so much easier and require less tooling. After having spent ages building a tenon and mortise jig copied from a Robbie O'Brien video I'm stupidly reluctant to change.
John, how to you tighten the hanger bolts in?

_________________
We are all in the gutter but some of us are looking at guitars.


Top
 Profile  
 
Display posts from previous:  Sort by  
Post new topic Reply to topic  [ 68 posts ]  Go to page Previous  1, 2, 3  Next

All times are UTC - 5 hours


Who is online

Users browsing this forum: Hock and 35 guests


You cannot post new topics in this forum
You cannot reply to topics in this forum
You cannot edit your posts in this forum
You cannot delete your posts in this forum
You cannot post attachments in this forum

Jump to:  
Powered by phpBB® Forum Software © phpBB Group
phpBB customization services by 2by2host.com